All posts by David H. Lawrence XVII

Blackout Mode

Return to Help home


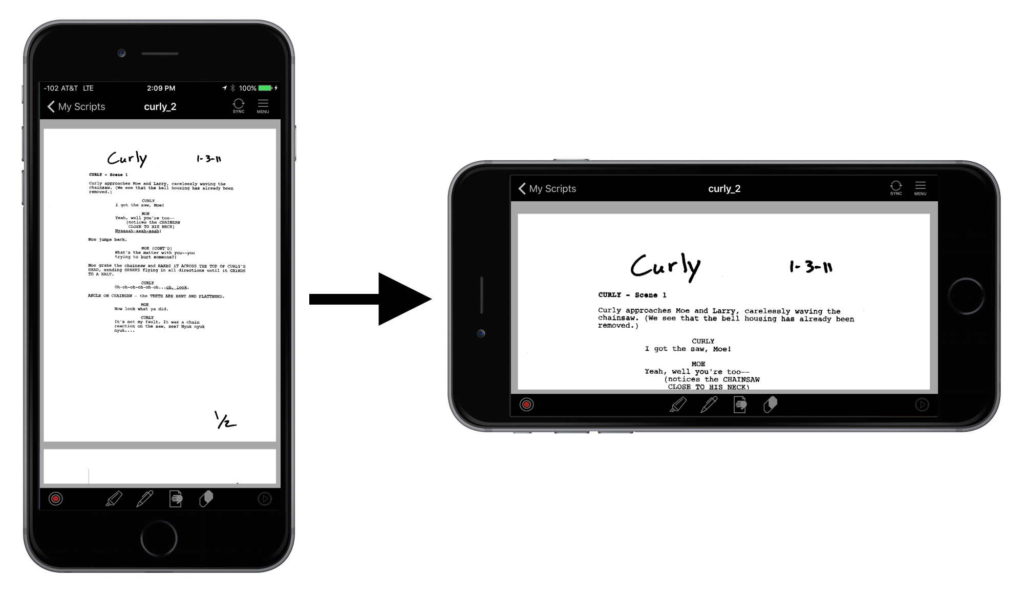
We always recommend that you use the recording/playback function to create scenes and rehearse with them.

But maybe you’re old-school, and instead of recording, you’re used to covering your lines with your hand as you go down the script, saying your lines aloud and then peeking at them to see if you got the lines right.

We’ve got you covered with Blackout mode, invoked with the icon on the bottom toolbar that looks like a page with a hand covering it.

Here’s a video that shows you how to use Blackout mode, with a step-by-step below that:

Step by step

To use Blackout mode with just one color of highlighting:

  1. Highlight your lines in that one color.
  2. Tap on the Blackout Mode icon on the bottom toolbar. It looks like a page with a hand covering it.
  3. All your highlighted lines will go black (if they don’t, select the proper color to blackout using the directions that follow these below). To peek at them as you move through the script, tap and hold for as long as you want to see them, and release to have them go black.

To use Blackout mode when using more than one color of highlighting:

  1. Highlight your lines in one color.
  2. Highlight other characters’ lines in other colors.
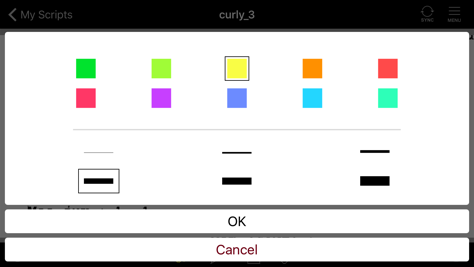
  3. Tap and hold on the Blackout Mode icon on the bottom toolbar.
  4. Select the highlighting color you want blacked out, usually the color with which you highlighted your lines.
  5. The lines highlighted with your selected color will go black, and the others will not. To peek at those lines as you move through the script, tap and hold for as long as you want to see them, and release to have them go black.

Return to Help home

How To Highlight Your Script

Return to Help home


Now that you have your script displayed on your screen, choose your orientation by rotating your device to either portrait (taller, with your device straight up) or landscape (wider, with your device on its side).

how-to-rehearse-iphone-6-plus-home-screen-rotation

We’ll be using the landscape mode from here on, but you can certainly use Rehearsal® Pro in portrait mode if you prefer.

Scroll to where you want to begin highlighting your lines. You scroll by using your finger, and swiping from the bottom of your screen to the top:

rehearsal-pro-scrolling-script-480w

Then, using two fingers to expand or contract the image on your screen, zoom in on your lines so they fill the width of your screen:

rehearsal-pro-zooming-in-480w

Then, tap and hold on the highlighting tool on the toolbar at the bottom of the screen. It’s the first tool in the set of four:

how-to-rehearse-iphone-6-plus-home-screen-rotation-highlight-tool

Tapping on it once selects the tool, with the last color used. In this case, after tapping, it shows yellow:

how-to-rehearse-iphone-6-plus-home-screen-rotation-highlight-tool-active

Tapping-and-holding on the highlight icon for two seconds, brings up the highlighter selection screen, where you can choose your color and thickness of the highlight:

how-to-rehearse-iphone-6-plus-home-screen-rotation-highlight-tool-selection-screen

Then, using the highlight tool, pretend that the tip of your finger is the tip of a real highlighter, and highlight your lines by simply swiping them from left to right (or right to left). You can scroll up and down in your script, but you can’t scroll left to right – your script is locked in that direction so you can apply the highlighting:

rehearsal-pro-highlighting-lines-480w


Return to Help home

Collating Pages

Return to Help home


PREP: ROTATE >> CROP >> TINT >> COLLATE

Step 4, the final step in the Script Prep process, is collating your pages, by moving pages around and changing the order in a script, by removing pages from the existing script, or by adding pages from another script, after tinting any pages in step 3. Just answer positively to the request asking you if you want to collate any pages.

Again, you can also do this ad hoc, when working with any script in My Scripts, by choosing Collate from the menu in the upper left hand corner.

Here’s a video that shows you how to collate your pages, with a step-by-step below that:

Step by step

  1. Once you finish any rotating, cropping or tinting, you’ll be asked if you want to collate your script’s pages. If you do, tap Yes.
  2. To move pages within a script, scroll through your script until you find a page you want to move.
  3. Use the thumb on the right of the page to move the page where you want it to be.
  4. Repeat that for all pages you want to move.
  5. To delete pages within a script, scroll to the page you’d like to delete, and either swipe to the left to reveal the Delete button, or tap in the red circled hyphen on the left side of the page to reveal it. Then tap on Delete to delete the page.
  6. Repeat that for all pages you want deleted.
  7. To add pages from a script, tap on the plus sign in the green field at the right of your screen.
  8. Pick the script from which you want to add pages from your list of scripts. That script will appear on the right hand side of your screen, next to the current script you’re prepping.
  9. Tap and hold to move any pages to be added or rearranged in either script to wherever you want them to be, deleting unnecessary pages as you wish.
  10. When you have everything the way you want, tap Save at the bottom of the script.
  11. Tap Next or Done when you’re finished.

Once finished, Rehearsal® Pro then show you your newly collated and fully prepped script, and you can continue on with the rehearsal process, to mark it up and rehearse with it.


Return to Help home

Tinting Pages

Return to Help home


PREP: ROTATE >> CROP >> TINT >> COLLATE

After cropping any pages you care to, Step 3 in the Script Prep process is tinting any or all pages in a script, with revision colors.

(You can also tint pages by choosing the Tint menu item when viewing a script in My Scripts.)

Here’s a video that shows you how to tint your pages, with a step-by-step below that:

Step by step

  1. Once you finish cropping pages (or answering No to cropping pages), you’ll be asked if you want to tint any pages. If you do, tap Yes.

    Or, when in a script after you’ve begun to rehearse with it, choose Tint from the menu in the upper right hand corner.

  2. Scroll through the pages of your script until you find a page you want tinted. Tap on the page.
  3. On the color picker that comes up, tap on the color you want to tint the page with. A check mark will appear.
  4. Tap Done to confirm your choice. You’ll be returned to your now tinted page in your script. If you want to clear that color, tap on the tinted page.
  5. Repeat that for all pages you want tinted.
  6. Tap Next when you’re finished.

Once finished, Rehearsal® Pro will save all the prep changes you’ve made, and will present you with the newly prepped script, ready for rehearsing. It will then ask you if you want to collate your script (adding, deleting or rearranging pages), which we’ll cover in the next video – just click or tap on the link below.


Return to Help home

Cropping Pages

Return to Help home


PREP: ROTATE >> CROP >> TINT >> COLLATE

Step 2 of the 4 steps in the Prep Script process is cropping pages. This allows you to grab just what you need from each of your scanned in (and maybe now rotated) pages.

Cropping really helps you when you get a script that’s been scanned in with side-by-side pages – you can crop the left and right pages in separate pieces, in order, and can then work with the script as normal. Rehearsal® Pro works best with a single column of pages, not the side-by-side look of double pages – you want to be able to smoothly scroll down your pages as you work, not scroll down the left side of each page, then up to the top of the right side and down.

Here’s a video that shows you the whole process:

And here’s how to do it step by step:

  1. Add your new script, name it, save any information on the Script Information screen and then tap on Prep Script (not Rehearsal) to start the cropping process.
  2. You’ll be asked, “Would you like to rotate any or all of the pages in this script?” You can either answer Yes if you need to rotate the pages, or No if you don’t. If you need instruction on how to rotate the pages of your script, you can find them here.
  3. You’ll then be asked, “Would you like to crop any or all of the pages in this script?”. Here, tap on Yes.
  4. You’ll now see a screen whose title is the title of your script. Scroll to the first page you want to crop a new page from. You don’t have to crop from any page that doesn’t help you rehearse, like cover pages, title pages etc.
  5. Tap on that first page.
  6. You’ll now see that page with a blue frame to the left. You can drag that frame anywhere you like, and you can resize the frame from any corner to outline just what you want cropped from the page.
  7. Position the frame to border the lines on the left page first. You want that page ahead of the right page when you’re finished.
  8. Once you have the frame positioned where you want it, tap Preview in the upper right hand corner of your screen.
  9. If the preview looks right, tap on Add Page. The page will be cropped and sent to the beginning, or top, of the script. (If you don’t have it quite right, and need to reposition the cropped area, tap on Cancel instead, and reposition the frame.) The page will float up (to the beginning of the script).
  10. You now are back on the Crop Page screen, and you can now move the frame to the right page, and repeat the cropping process to send that second page to the top of the script, just after the first page you cropped. Now, the pages are in order: “cropped” page 1 (the left hand page you cropped), then “cropped” page 2 (the right hand page you cropped), then original page 1, original page 2 etc. You won’t see this, but that’s how they are now arranged.
  11. Once you’re done cropping from an original page, tap on Pages to go back to your original script. Scroll down to the next page you want to crop from, and repeat the process for all of the pages you want to crop.
  12. Once you’ve finished, go back to your Pages one last time, and instead of choosing a page to crop, instead, tap on Next in the upper right hand corner.
  13. You’ll now be asked to choose an action: delete the original scanned in pages, leaving only your cropped pages in this script (very useful when all you have to do is crop the pages, and nothing else), or keep the original pages. We suggest deleting the original scanned in pages, so you can move on to rehearsing. If you choose to delete the original pages, there will be a warning to make sure that’s what you want to do. Just a fail-safe.

Once you’ve finished all your cropping, Rehearsal® Pro will ask you if you want to tint pages of your script. That’s Step 3.


Return to Help home

Rotating Pages

Return to Help home


PREP: ROTATE >> CROP >> TINT >> COLLATE

Step 1 in the Script Prep process is rotating your pages.

Why would you want to do that? Stage actors are the most likely candidates for this Script Prep step, since producers will often take the play folio, open up the book, plop it face down on the scanner and scan each set of side-by-side pages until they have the script copied. Then, they send it off to the actor.

But Rehearsal® Pro works with single pages, not side by side pages two at a time. Not to worry – rotating pages is your first step.

You can rotate any page to the left, to the right, upside down, however you need to correct the way the pages were scanned, before moving on to tint any pages in step 4.

Here’s a video that shows you how to rotate your pages, with a step-by-step below that:

Step by step

  1. Once you tap on Prep Script, you’ll be asked if you want to rotate your script’s pages. If you do, tap Yes.
  2. To rotate a single page within a script, scroll through your script to locate page you want to rotate. Tap once on that page to select it. To select all pages, tap on the Select All Pages button (the 4th of 5 buttons on the bottom bar). If you decide you don’t want any pages selected, tap on the Deselect All Pages button (the 5th of 5 buttons)
  3. Once you select a page (or all pages), a blue check mark will appear on any selected page.
  4. Tap on the icon that shows you the rotation you want: 90 degrees to the left, 90 degrees to the right, or 180 degrees upside down.
  5. Repeat that for all pages you want to rotate.
  6. Tap Next when you’re finished.

Once finished, Rehearsal® Pro will ask if you want to crop content from your pages. And that’s the next step, Step 2, of the Script Prep process.


Return to Help home

The Script Prep Process

Return to Help home


Sometimes, a script isn’t in perfect screenplay shape: single page, portrait, uniformly letter or A4 sized and continuous.

(NOTE: If your script is in great shape, and it will be if it has been generated from Final Draft, Word, celtx or any other word processing or playwriting software, you don’t have to prep your script at all. You can skip this whole process and just tap on Rehearsal button on the screen that asks if you want to prep your script as shown below.)

But sometimes, you receive your script and it isn’t in great shape to use in Rehearsal. A typical situation might be when you receive a script for a play, that is scanned in, two pages at a time, side by side, and rotated 90 degrees out of position, as shown below:

And that’s where Rehearsal® Pro’s Script Prep process comes in, and we’ve made it a seamless, modular process for you to use.

If you choose the Prep Script button instead, as shown below…

…you then take 4 different optional steps, in a series, to prep your scripts for use in the app:

1. You first can rotate any or all pages 90 degrees left, 90 degrees right, or 180 degrees upside down. You can also skip the rotation step, and not rotate any pages.

2. You can then crop content from the pages you have, either having rotated the pages or skipping that step. In the case of the script above, you’d crop the left hand page, then the right hand page, etc. But a script might just be in need of some trimming here and there. You can skip this cropping step as well, and not crop any of your content.

3. You can then tint any of your pages in industry-standard revision colors, like blue, pink, yellow, green, goldenrod, buff etc. You can skip this tinting step as well, and not tint any of your pages.

4. Finally, you can collate your pages, removing pages you don’t need or want, and moving new updated pages into another existing script. You can skip this final collation step as well, and move right to rehearsing your script.

A note about collation: you don’t need to remove pages in your script, just because you don’t have lines on them (there may be very important information on those pages that give you clues you might find useful about your character, other characters and the story). Rehearsal® Pro doesn’t make you scroll through pages to get to your next scene; you simply pick the scene you want to move to in My Scenes. You can also bookmark pages in your script.


Return to Help home

Using The Script Information Screen

Return to Help home


With each script you add to your Rehearsal® Pro library, there is an associated screen of information you can add, including the title of the episode, the production information, the union contract, the audition or work appointment, notes, casting, writer, director, location, date and time and more.

Here’s a video that shows you how to enter that information, with a step-by-step below that:

Step by step

  1. Once you add a new script, you’ll be given a chance to name it. Do so, and tap Done.
  2. The next screen you’ll see is the Script Information screen. Fill out as much or as little information on this screen as you like.
  3. Tap Save when you’re finished.

You can access and edit this script information screen at any time by tapping on the blue ( i ) icon to the right of the script’s name in the list found in My Scripts.


Return to Help home

Adding A Script From Box

Return to Help home


icon-boxSometimes, scripts are so large that they can’t be sent to Rehearsal® Pro via email.

This is usually due to them being scanned in at too high a quality level than required, resulting in very large file sizes. Users then resort to using a cloud service, like Box (also known as Box.com), to upload the script and send a link to the file.

Simply sending a link to a file you have stored (or have been given access to) in Box won’t be visible to our servers. Don’t send an email to your script+username address with a Box link – it won’t work.

You either need to attach the actual PDF of the script, or, if the script is too large to attach, follow the step-by-step directions below for adding the script from Box:

  1. Make sure you have the Box app. You can get it from the iTunes App Store. It’s free.
  2. Using the Box for iPhone/iPad app, upload your script and view it (or view a script you’ve been given access to) on your iPhone or iPad.
  3. Tap on the Sharing icon on the bottom action bar that looks like a square with an arrow pointing out of it.
  4. Tap on the similar icon in the popup menu that appears, labeled Open in…
  5. Look for the Rehearsal® Pro icon in the list of apps, then tap on it to add your script.
  6. Go to the Add New Script area in Rehearsal® Pro and you’ll see the script there.

Return to Help home

Adding A Script From iCloud

Return to Help home


icon-icloudSometimes, scripts are so large that they can’t be sent to Rehearsal® Pro via email.

This is usually due to them being scanned in at too high a quality level than required, resulting in very large file sizes. Users then resort to using a cloud service, like iCloud, to upload the script and send a link to the file.

Simply sending a link to a file you have stored (or have been given access to) in iCloud won’t be visible to our servers. Don’t send an email to your script+username address with a iCloud link – it won’t work.

You either need to attach the actual PDF of the script, or, if the script is too large to attach, follow the appropriate step-by-step directions below for adding the script from iCloud (there are two ways files can be shared, so pay attention to which is your case).

Before you can use iCloud, you have to go to Settings >> iCloud >> Show on Home Screen and turn that on.

If you’re using iCloud to get a script you have uploaded to iCloud, do this:

  1. Using the iCloud Drive app, upload your script and view it (or view a script you’ve been given access to) on your iPhone or iPad.
  2. Tap on the Sharing icon on the title bar that looks like a square with an arrow pointing out of it.
  3. Tap on the icon that’s labeled Copy to Rehearsal® Pro
  4. Go to the Add New Script area in Rehearsal® Pro and you’ll see the script there.

If someone has sent you a link in an email to an iCloud-based script, do this:

  1. Use the Mail app (not any other app like Gmail) to see the message containing the link, on your iPhone or iPad.
  2. Clicking on the link will either open it in the iCloud Drive app, and you can follow the instructions above, OR
  3. It may open in Safari, but DON’T tap the “share” button (square with up arrow) on the bottom.
  4. Instead, tap on the script and a top menu will appear for a few seconds. On the left will be Open in…. On the right *may* be Open in Rehearsal® Pro. Choose the appropriate one and your script should be loaded into Rehearsal.
  5. Go to the Add New Script area in Rehearsal® Pro and you’ll see the script there.

Return to Help home