All posts by David H. Lawrence XVII

Exploring The Main Menu

Return to Help home


The Main Menu on Rehearsal® Pro is the starting point for you when working with the app. It has several buttons, and you should know what they all do. We’ll explore each of the areas the buttons take you to in individual help videos.

Here’s a video that shows you what each button is and what they control:

Button by button

Here are all the buttons on the Main Menu and what they do:

main-menu-numbered
  1. The Information button: shows you information about the Rehearsal® Pro app
  2. The Add New Script button: shows you scripts that have been sent to the app, and scripts you’ve already added.
  3. The My Scripts button: shows you scripts in your Rehearsal® Pro library
  4. The My Scenes button: shows you scenes you’ve recorded
  5. The Help button: shows you these help files, FAQs and tutorials
  6. The Store button: shows you products that might be useful in your acting career
  7. The Account/Settings button: active when logged in, shows you your account information
  8. The Register/Login button: active when you have yet to register the app, or need to log in

Return to Help home

Adding Rehearsal® Pro To Another Device

Return to Help home


You don’t have to pay again for Rehearsal® Pro if you want to put it on more than one device, like an iPhone and an iPad or iPod Touch. You simply have to use the App Store app on your additional device, look up Rehearsal® Pro, and tap on the cloud icon to download it. Just so you know, this is true for any app in the App Store, and you can put any app on up to 5 devices.

IMPORTANT: Your version of iOS may require you to go to Updates in the App Store app, tap on your account picture, then Purchased, then Not on this [device] to find and download your copy of Rehearsal® Pro.

Here’s a video that shows you how, with a step-by-step below that:

Step by step

  1. From the desktop of the additional device on which you want to add Rehearsal® Pro, tap on the App Store icon.
  2. Search for Rehearsal® Pro.
  3. Select it from the list of results if it doesn’t come up first, and tap on the cloud icon to download it to the new device.
  4. You may have to go to Updates in the App Store app, tap on your account picture, then Purchased, then Not on this [device] to find your copy of Rehearsal® Pro, depending upon your version of iOS.

Return to Help home

Changing Your Password

Return to Help home


Changing your password in Rehearsal® Pro is very simple.

Here’s a video that shows you how, with a step-by-step below that:

Step by step

  1. Go to the Main Menu on the Rehearsal® Pro app.
  2. Tap on the Account/Settings button in the lower right hand corner.
  3. Tap in your new password in both the New Password text area, and then the exact same password in the Confirm New Password text area. If they don’t match, you’ll be asked to enter them again.
  4. Once you’re certain they match, scroll to the bottom of the screen and tap on Update. Your password will be updated.
  5. You’ll automatically be signed out of your account. Sign back in with your new password.

Return to Help home

How To Add Additional Senders

Return to Help home


We only allow scripts to be sent to your script+username Rehearsal® Pro email address from the address you registered with – and any address you yourself add to your account. This can be your agent, manager, the production office of a show you’re working on, but no one else. We do this for security purposes, and so that your Rehearsal® Pro account doesn’t get spammed.

If you want to add additional senders, it’s easy (and if you want to remove a sender, scroll to the bottom of this page for those simple directions).

Here’s a video that shows you the whole process:

And here’s how to do it step by step:

1. From the Main Menu, tap on the Account/Settings button in the lower right hand corner. (If that button says Register/Login, then log in to your account first.)

2. Scroll almost to the bottom of your account page and tap on Add another email address.

3. Tap in the email address you’d like to add to your approved senders list. Be very careful to be accurate when tapping in the address.

4. When you’re finished, tap Done, just above the keyboard.

5. To complete the process, tap Update just below where you entered the new sender email address, and your newly added address will now be able to send you scripts. You’ll see a message at the top of your page that shows you the address has been added, and the email address you added will receive a message, telling them that they’ve been added.

To remove an approved sender, go to this same screen and tap the check box next to the address you want to remove, then tap Update. The address will be deleted from your list.


Return to Help home

Your script+USERNAME Address

Return to Help home


When you first register for Rehearsal® Pro, you register with your email address, and you choose a username, password and more.

The email address you register with is the only email address you can send scripts FROM (unless you add additional authorized senders).

Once you’ve registered, you’re assigned a unique email address in our system that is only email address you can send scripts TO your copy of Rehearsal® Pro. It’s in the form of:

[email protected]

…where USERNAME is your chosen username. So, if your Rehearsal® Pro username is “joesmith” your personal, permanent address for this account is:

[email protected]

(note that the word “script” in the email address is just simply the word “script,” not the name of any script or it’s filename you might be sending – just “script”)

Please make sure you know exactly what your script+USERNAME email address is, and that you make an entry for it in your email contacts. We suggest that you make the name associated with that contact the word “Scripts.” Don’t make it “Rehearsal” because when you start typing in R-e-h… your email service might autopopulate our support address ([email protected]) – and sending your scripts there won’t work.

Here’s a video that gives you an review of your script+USERNAME email address:


Return to Help home

How To Activate Your Account

Return to Help home


If you don’t yet have a Rehearsal® Pro account, you’ll need to create (and activate) one before you can start rehearsing.

We’ll start with the Sign In or Sign Up screen, displayed after the quick tutorial and permissions requests when you first launch the app:

sign-in-or-sign-up-dialog-zoomed

Choose Create new account, and fill in the information on the form.

Be very careful to accurately tap in your username, password and email address. If you mis-tap that info, you won’t be able to log in.

When you’re finished, tap Register at the bottom of the form.

registration-screen-bordered

Within a few minutes, you’ll be sent an activation email message from us, and you’ll need to click on the uniquely coded link in that email to complete the registration process.

We do this because we want only correct email addresses in our database. This activation loop assures that.

If it doesn’t arrive in your inbox within a few minutes, check your spam folder, or any folder in which you may have directed mail from us to be filtered into.


Return to Help home

FAQ

Return to Help home


Managing Rehearsal® Pro


Why do I have to register?
Professional actors work in a closed environment, where keeping sides and scripts safe is paramount. And that safety begins with being accurate with email addresses. Registration and activation of an account allows us to maintain that accuracy and privacy. The action of having you respond to an email addressed to what you entered in your registration screen assures that you tapped it in correctly, and that it was you who actually started the registration process.

Why do I have to authorize other email accounts to send?
We don’t want any spam to be able to get into your Rehearsal® Pro inbox, so we only allow authorized email addresses, email addresses that you confirm that you want to be able to send scripts to Rehearsal® Pro, to get through.

Are my scripts safe? I signed an NDA, you know.
Although no security efforts will ever be 100% impenetrable, we’ve employed, since the very beginnings of Rehearsal in 2009, many different and simultaneous methods of keeping your scripts safe. Bi-direction encryption in the app and on our servers, with the highest strength algorithms available, the authorization of you and any added senders, registration of all users and more.

We never see, and can’t see your scripts, so your NDA is not being violated (we actually worked with the studios on this). A great example is the highly-safeguarded MARVEL’s Agents of SHIELD scripts that one of our best known users, Clark Gregg (Director Coulson), pulls into Rehearsal® Pro every single day he’s shooting (and 144,000 other users with similar requirements do as well).

Truth be told, just sending out a script as an attachment is far more dangerous for the producer than you sending it to Rehearsal® Pro, because the recipient could simply forward it, by mistake or on purpose, to anyone via email. They could post it online in a fan forum. They could share plot points via social media. But that can’t happen with our closed, protected system.

Here, in a video interview in Variety, Christian Slater talks about his use of Rehearsal, and is asked by Homeland’s Miranda Otto about the safety of the scripts:

Hopefully, she’ll see this answer and know why we think we safeguard our users’ scripts very well.


Is there an Android or Macintosh version of Rehearsal® Pro?
No, there isn’t. It’s only available for iOS devices, like iPhones, iPads and the iPod Touch.

What does the red badge on the app's icon mean?
​That’s the number of scripts you have in your New Scripts category in Add New Script. As soon as you add a script to your My Scripts library, that number will update to reflect the scripts still waiting.

Getting Scripts into Rehearsal® Pro


I can't send my script via email. It's too big.
Usually, scripts should be a few megabytes at most, often less than 1 megabyte when pure text. But sometimes, scanned scripts can be so large they need to be sent via a cloud account. Check the help files for how to get scripts into Rehearsal® Pro from the cloud account you use.

Using Rehearsal® Pro


Does Rehearsal® Pro have a dark mode?
No, it doesn’t. Rehearsal does it’s level best to recreate what happens in the real world with paper scripts, and there are no scripts that are black pages with white type in the real world. Even colored revisions are light paper with black type. We realize it would be less bright in a dark theater or on a dim sound stage to have a dark mode, but that’s what the brightness control on your iPhone or iPad is all about.

Where is the scene I've recorded? I can't find it.
You’re probably in My Scripts, as opposed to where all your scripts are stored: My Scenes. Go to My Scenes from the main menu, and you’ll find them all.

I got a phone call while I was recording. It stopped Rehearsal® Pro from recording. Can I pick up where I left off, or do I have to start all over again?
We strongly suggest that you set your device to Do Not Disturb (DND) mode before you start recording. If you get a notification during your recording session, it may or may not halt the recording (and no, you can’t pick up where you left off if it gets stopped). If you get a phone call, the recording will always be stopped, and you’ll have to re-record your scene or Lineset line.

I can't record. It just keeps beeping at me.
Make sure Rehearsal® Pro has permission to use your device’s microphone. Go to the Settings app >> Privacy >> Microphone and check.

How do I rename a scene?
1. Go to My Scenes.
2. Tap on the Edit button in the upper right hand corner.
3. Tap on the scene name.
4. Rename.
5. Tap Done.

I can't hear playback. I see the meters moving, but no sound.
Make sure your device is not muted, and make sure you don’t have the volume turned all the way down. Also, check to make sure you don’t have a Bluetooth device engaged, like a set of earbuds, a smart speak, or a car audio system that may not have the volume turned up.

How do I get Siri to read my scene partner's lines?
You don’t. It sounds cool, but it would be anything but.

Professional actors don’t find using a disembodied voice, like a digital assistant’s, to be at all helpful with the context of the scene. These voices only say a line one way. Always. That’s not useful to you as a pro, so, no, there is no option for that in Rehearsal® Pro.

Here, watch this to see why:


Helpful Tools


Why can't I search my script?
Rehearsal® Pro gives you an alert when you try to search in a graphic-based PDF, like a scan. You can search text-based PDFs.

Even More Info


Why did all my markup disappear after a sync?

This usually happens when you tap the SYNC button on a script that has been marked up on a different device. Remember, tapping the SYNC button replaces what’s on all other devices with the marked up version of your current device.

Still need help?

Click here to send us a message.


Return to Help home

Getting Set Up With Rehearsal® Pro

Return to Help home


Welcome! You’ve successfully downloaded and installed Rehearsal® Pro. Here’s how to properly set up your app.

Before you get started, please know that all of your scripts from Rehearsal 2 will be located in Already Added Scripts in Add New Scripts. NOTE: because Rehearsal 2 had no way of uploading your markup (highlighting, scribbles, comments, beat marks and scenes), the scripts will be the way they were when you added them originally, with none of the markup you’ve added. You can still use Rehearsal 2 for any scripts you’re currently working on, but at some point, start using Rehearsal® Pro exclusively.

We’ll start with the quick tutorial screens and permissions requests you’ll get when you first open the app:

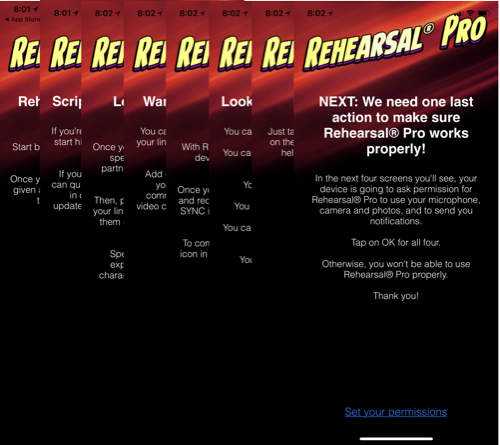
There are several that follow the first one you’ll see, describing what the app is all about. Once you’ve seen all those, you’ll be presented with the permissions screen.

Allow access to your mike, camera, and photos…

When you first start to use your account, you may see an alert like this:

request-mic-cam-cropped

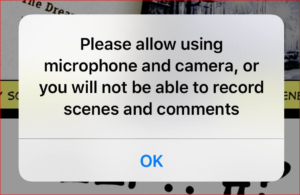
Rehearsal® Pro uses your microphone to record your scenes, and uses your camera to record video comments. It also allows you to use existing photos for comments on your scripts. So, on this screen, click the checkbox next to all of the options. If you don’t, you won’t be able to use Rehearsal® Pro properly. You’ll find that you can’t record your scenes, and the app will continually beep at you when you start to record, and nothing will be recorded.

…allow Rehearsal® Pro to send notifications…

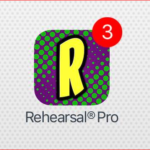
The little badge on Rehearsal® Pro’s desktop icon tells you how many scripts you have waiting for you to add to your library. This shows that the user has 3 scripts waiting:

desktop-icon-with-badge-cropped

You will see this alert when you first start:

request-notifications-cropped

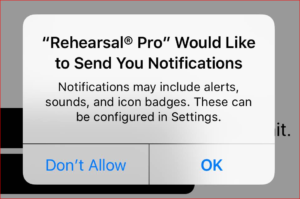
Allow this, and a simple glance at Rehearsal® Pro’s icon will notify you that you’ve got work to do.

…and consider allowing cellular data

This is up to you, depending upon the data plan you have with your carrier. We suggest that you do your work with your WiFi on. If it is, your scripts, markup, audio, video, and communication with our server will all occur over WiFi.

If you don’t have WiFi available, and all you can use is your mobile cellular data, it may cost you money to do so. That’s why we alert you to choose what you’d like to do. Whatever your selection, you can always change it in the Settings >> Cellular >> USE CELLULAR DATA FOR: list of apps. Scroll down to Rehearsal® Pro and choose to have it on or off.

Here’s a video that shows you how to fill all that in so that we can get going using the app!

NOTE: We do need all the permissions shown there. Please enable all of them.

When you’re finished giving us the permissions we need, you’ll be presented with the the Sign In or Sign Up screen:

sign-in-or-sign-up-dialog-zoomed

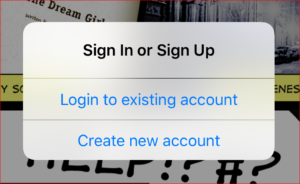
Already have a Rehearsal® account?

If you already have an account from an earlier version of Rehearsal® (2 or 2.5), you can log right in and see all your existing raw scripts. You want to do that, instead of creating a new account.

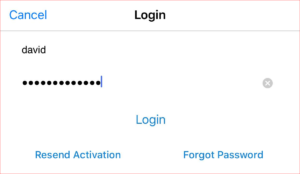
When presented with the Sign In or Sign Up screen, tap on Login to existing account, enter the same username and password you’ve always used on the Login screen, then tap Login:

login-screen-cropped

Don’t yet have a Rehearsal® Pro account?

If not, you’ll need to create one.

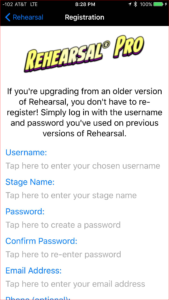
On the Sign In or Sign Up screen, choose Create new account, and fill in the information on the form.

Be very careful to accurately tap in your username, password and email address. If you mis-tap that info, you won’t be able to log in.

When you’re finished, tap Register at the bottom of the form.

registration-screen-bordered

Activate your account

Within a few minutes, you’ll be sent an activation email message from us, and you’ll need to click on the uniquely coded link in that email to complete the registration process.

We do this because we want only correct email addresses in our database. This activation loop assures that.

If the activation email doesn’t arrive within a few minutes, see Can’t locate your activation email? below.

Don’t remember your password?

If you’ve forgotten your password, you’ll need to reset it. Here’s how:

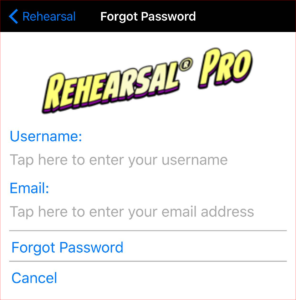
1. Tap on the Forgot Password button on the Login page.

login-screen-cropped-forgot-password

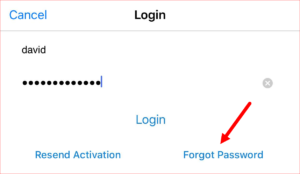
2. Tap in your username and email address. Then tap on the Forgot Password button. If you can’t remember your username, just enter your email address, and the system will send you both your username and password.

forgot-password-screen-cropped

3. You’ll get a confirmation email requesting you to click on the Confirm link so we know it was you who asked for the reset password. Confirm that, and you’ll receive a temporary password via another email message.
4. Read that email message on your device, and copy and paste that temporary password when logging in.
5. Tap on the Account/Settings button from the main menu, and change your password to whatever you want.

Can’t locate your activation email?

Our activation emails usually arrive in your inbox just fine. But sometimes, your Internet Service Provider, the company you get your email access from, will misunderstand the content of the activation email from us, treating it as spam.

So first, check your Spam folder to see if it’s in there. Also, check any folders that email might be filtered into.

If you can’t find it anywhere, you can request that we re-send the activation email.

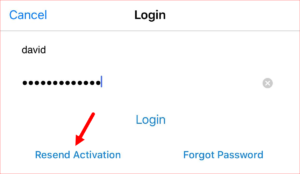
1. Tap on the Resend Activation button on the Login screen:

login-screen-cropped-resend-activation

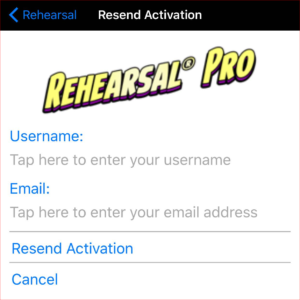
2. Tap in your username and email address. Then tap on the Resend Activation button.

resend-activation-screen-cropped

Be patient. If it still hasn’t arrived in a reasonable amount of time (say, 1/2 hour), contact us via the support email system. You can reach that from the main help screen.

All Your Old Scripts Are There

When you first register Rehearsal® Pro, all of your old scripts will be available to you in the Already Added Scripts section of your Add New Scripts area, but they will be the original scripts, with no markup. You can only sync markup that you’ve created in Rehearsal® Pro.


Return to Help home

What’s New In Rehearsal® Pro

Return to Help home


Rehearsal® 2 changed the way over 100,000 actors have learned their lines, explored their characters and mastered their scenes. And now, Rehearsal® Pro has been redesigned and rewritten from the ground up to help you get off-book and book more work.

Here’s what’s now and new in Rehearsal® Pro:

  • Rehearsal® Pro has new iOS look and feel
  • Redesigned Main Menu
  • Redesigned information screen ( i )
  • Add scripts by emailing them to your Rehearsal® Pro account
  • Add scripts by taking photos of physical pages with the device’s camera and Adobe Scan
  • Add scripts from cloud services like Dropbox, Google Drive, Box and iCloud
  • Edit the list of scripts in Add New Script
  • Add and edit project information for each script
  • Edit the name of any script in My Scripts
  • Rearrange the order of scripts in My Scripts
  • Archive scripts you no longer want shown in My Scripts
  • Automatically sync scripts between your devices
  • Rotate pages scanned in “sideways”
  • Crop content from side-by-side or odd-sized pages
  • Collate pages: add, delete or rearrange pages within a script or set of scripts
  • Tint pages to industry standard versioning colors
  • Edit the name of any scene
  • Rearrange the order of scenes in My Scenes
  • Group scenes for multi-scene rehearsal
  • Automatically sync scenes between your devices
  • Choose from 10 highlighter colors
  • Choose from 6 highlighter stroke thicknesses
  • Choose from 10 scribble colors
  • Choose from 6 scribble stroke thicknesses
  • Undo like an Etch-A-Sketch: just shake your device
  • Choose the highlight color you want to blackout
  • Tap to erase markup
  • Select region to erase markup
  • Recording timer
  • Pause when recording/resume recording
  • Playback timer
  • Pause when playing back/resume playback
  • Drag progress button forward/backward in scenes
  • An adjustable timeline allowing selected portions of scenes to be repeated
  • Car Play mode, offering large, simple playback controls when rehearsing while driving
  • Record Linesets: individual lines in sets, played back one at a time in sequence
  • Rename Linesets and lines within them
  • Rearrange the order of Linesets and lines within them
  • Enable and disable lines within linesets
  • Text comments content now visible on the script page
  • Photo comments content now visible on the script page
  • Video comments content now playable on the script page
  • Audio comments content now playable on the script page
  • All comments are resizable and movable
  • All comments can be minimized to an icon
  • Print any marked up script to AirPrint
  • Print any marked up script to PDF
  • Email any marked up script as PDF
  • Email scene audio/VO auditions as MP3
  • Add/edit/re-order bookmarks
  • Go to any page number
  • Engage a friend to prepare your script and scenes for you
  • Engage a paid Reader to prepare your script and scenes for you
  • Become a Elite Reader to certify your expertise in preparing scripts and scenes
  • Become an paid Reader to prepare scripts and scenes for others

…and so much more.


Return to Help home

Simple Five-Step Beginner’s Tutorial

Return to Help home


Want to quickly get up and running with Rehearsal® Pro in just five simple steps?

Once you get your account registered and activated, and you know your unique script+username email address, it’s a snap.

We’re going to assume that you’ve been emailed a set of sides in PDF format from your agent or a casting office, or you’ve been mailed a script from the production team of a project you’re working on. If you’re not working with a PDF, refer to the additional help pages on the main help page.

Step 1: Email your script to Rehearsal® Pro

To start rehearsing with a script in Rehearsal® Pro, the first step is getting the script into the app. The most common way to do this is to email your script to your script+USERNAME email address. In a few minutes, your script will show up in your Add New Script area, ready to be added, prepped and rehearsed.

Here’s a video that shows you how, with a step-by-step below that:

Step by step

  1. Forward the email containing your script PDF file as an attachment to your script+USERNAME email address you were given when you registered with the Rehearsal® Pro app.
  2. Wait for the confirmation email that tells you the script is waiting to be added. Once you get that, go to the Rehearsal® Pro app, and tap on the Add New Script button toward the top of the Main Menu.
  3. You should see the new script at the top of the list.

Step 2: Adding your script to your My Scripts library

Adding that new script to your My Scripts library is a snap. Just tap on its name to select it, then tap the Add button in the upper right hand corner.

To speed things along, we’ll keep things really simple on the next few screens that pop up:

  1. Keep the script name the same (just tap Done on the Name the Script screen)
  2. No need to add any additional information with the Script Info screen that pops up next (just tap Save)
  3. Finally, tap Rehearsal (not Prep Script) to move right to highlighting your script.

Step 3: Highlighting your script and recording your scenes

Now that you have your script displayed on your screen, choose your orientation by rotating your device to either portrait (taller, with your device straight up) or landscape (wider, with your device on its side).

how-to-rehearse-iphone-6-plus-home-screen-rotation

We’ll be using the landscape mode from here on, but you can certainly use Rehearsal® Pro in portrait mode if you prefer.

Scroll to where you want to begin highlighting your lines. You scroll by using your finger, and swiping from the bottom of your screen to the top:

rehearsal-pro-scrolling-script-480w

Then, using two fingers to expand or contract the image on your screen, zoom in on your lines so they fill the width of your screen:

rehearsal-pro-zooming-in-480w

Then, tap and hold on the highlighting tool on the toolbar at the bottom of the screen. It’s the first tool in the set of four:

how-to-rehearse-iphone-6-plus-home-screen-rotation-highlight-tool

Tapping on it once selects the tool, with the last color used. In this case, after tapping, it shows yellow:

how-to-rehearse-iphone-6-plus-home-screen-rotation-highlight-tool-active

Tapping-and-holding on the highlight icon for two seconds, brings up the highlighter selection screen, where you can choose your color and thickness of the highlight:

how-to-rehearse-iphone-6-plus-home-screen-rotation-highlight-tool-selection-screen

Then, using the highlight tool, pretend that the tip of your finger is the tip of a real highlighter, and highlight your lines by simply swiping them from left to right (or right to left). You can scroll up and down in your script, but you can’t scroll left to right – your script is locked in that direction so you can apply the highlighting:

rehearsal-pro-highlighting-lines-480w

Step 4: Recording your scenes

Recording a scene for rehearsal is the way you prepare to learn your lines. You say both your lines, and your scene partners’ lines, and once recorded, you’ll play the scene back over and over to rehearse, and learn your lines.

So, once you’ve finished highlighting your lines and adding any other markup, only then will you create your scene(s) by recording them. Those recorded scenes will then be stored in My Scenes, listed under each script you’ve got. Until you record your first scene, there will be no listing of scenes under My Scenes. As you record more scenes, and as you add more scenes from more scripts, your listings in My Scenes will grow accordingly.

NOTE: You don’t need to print out your script, or use a printout you already have, and record using that printout! You’ll see the script on your screen, and you’ll voice the recording AS YOU SCROLL THE SCRIPT ON THE SCREEN WITH YOUR FINGER. Rehearsal® Pro will record both your voice, and the movement of your finger on the screen, and will sync those up to play them back when you rehearse.

Here’s a video that shows you the whole process:

And here’s how to do it step by step:

1. To record your scene, first scroll to where your scene begins. Make sure your lines are already highlighted, and you’re zoomed in to the width of the dialogue. Also, make sure no tools are active, like the highlighter, the scribbler or the eraser.

2. To begin recording, tap on the record button at the very left of the bottom toolbar. You’ll hear three ADR beeps to allow you to get set.

Once those sound off, the audio meter will start moving and you can start your recording.

3. Scroll the script as you need to to move through the lines.

REPEAT: You don’t need to print out your script, or use a printout you already have, and record using that printout! You’ll see the script on your screen, and you’ll voice the recording AS YOU SCROLL THE SCRIPT ON THE SCREEN WITH YOUR FINGER. Rehearsal® Pro will record both your voice, and the movement of your finger on the screen, and will sync those up to play them back when you rehearse.

4. Say your lines with no performance effort at all. Just flat, but with the same pace you expect to use when you audition or perform the scene.

Say your scene partners’ lines with all the richness you expect once you do your performance (which can mean no richness at all, if you expect the flat, fast read of an audition reader).

5. When you’re finished, tap on the stop button at the very right of the bottom toolbar. This button is a stop button only while you’re recording. It turns into a play button immediately after you stop a recording.

6. The moment you stop the recording, the Name The Scene screen will appear. You can simply tap Done if you want to let Rehearsal® Pro name your scene, or you can use the keyboard to rename it to anything you want.

When you tap Done, you’re returned to the scene you’ve just recorded, and you’re ready to rehearse.

Record a second version of the scene

Once you’ve rehearsed your lines with this recorded scene, to the point where you know the lines cold, record a second version of the scene, but this time just mouth your words, don’t say them out loud.

Why?

With this second scene, you have no voicing of your lines to distract you, but you do have the timing you need to really work the scene. And if you find that in changing your performance with the lines that your timing is now off, go ahead and record a third silent scene with your new pace and delivery.

So, where does that scene get stored? They are in your My Scenes area, accessible from the front menu. They are grouped by script title, and in the reverse order that you record them.

Step 5: Rehearsing your scenes

Rehearsing a scene, learning your lines and discovering new ways to deliver them is the heart and soul of Rehearsal® Pro. You’ll play back the scene, then speak over your own lines and let the scene partners’ lines guide you through the scene. The playback will repeat automatically until you stop it, and the repetition will quickly get you off book.

To rehearse your scene, select the scene you want to use in your My Scenes area (not your My Scripts area):

selecting-scene-from-my-scenes

That will load up your selected scene and display it, ready to play.

Here’s a video that shows you the whole process:

And here’s the step-by-step process:

• To rehearse any scene, select it in My Scenes. Once the scene loads, tap on the play button at the very right of the bottom toolbar. You’ll hear three ADR beeps to allow you to get set, then your scene will begin.

• You’ll notice both a timer, and a progress button that travels along the bottom of your screen. If you go up on a line and want to go back, just drag that progress button to the left. Likewise, if you want to jump to a later point in the script, just drag the button to the right.

• As you first listen to your scenes, you can watch the script scroll by, and say your lines as they come up. Don’t worry about your performance just yet – that will naturally flow into your work as you repeat the process.

• Let Rehearsal® Pro say your scene partners’ lines. You’ll begin to remember the ends of their lines as the aural cues for your lines.

• Once you get to the end of the scene, Rehearsal® Pro will immediately repeat the scene, with the ADB beeps giving you a few seconds to reset yourself emotionally, as you restart the scene.

• Do this repeatedly until you are well versed in the lines, and you’ve started to feel out the way you’re going to perform the scene.

• When you’re finished, tap on the stop button at the very left of the bottom toolbar. This button is a stop button only while you’re playing back. It’s the record button when recording.


For more detailed instructions on how to use Rehearsal® Pro, keep clicking on the next article below, and read and watch all the videos – you’ll be a Rehearsal® Pro in no time!

Return to Help home